MB Medic Mercedes-Benz Repair Guides, Service, How To DIY

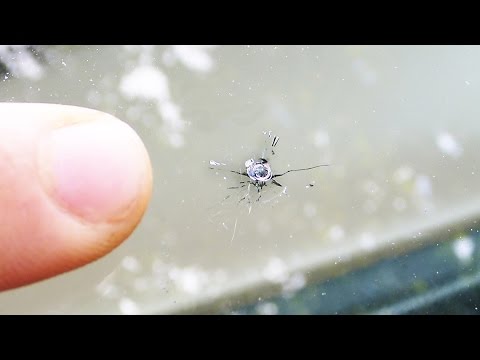
Easy step by step photo and video instructions for repairing a windshield rock chip or bullseye. Repairing a small windshield chip is a straightforward DIY job, even if this is your first time. So go ahead, do it all yourself; it’s easy. It is better to repair a rock chip to prevent the damage from spreading to unaffected windshield areas. The repair can reduce the risk of the damaged area spreading and will reduce the visibility of the chip. Before starting, inspect the damage carefully. DIY kits are intended for repairable chips in the outer layer of laminated windshield glass. Large damage, damage that affects the driver’s view, damage near a forward-facing camera or other windshield technology, or damage that penetrates more than one glass layer should be inspected by a professional.
We have included links to two of the highest-ranked kits. You could use either one, and either kit can work for appropriate damage, but follow the instructions supplied by the manufacturer. Both of these kits are highly ranked on Amazon. We used the Blue Star Rock Chip repair kit in this case. As you will see below, the steps are easy, but follow the instructions included with the kit you receive. The procedure may vary slightly by kit.
Parts needed: Windshield Repair Kit
Our two favorite kits are:
The choice is yours.
- We will show you how to use a syringe-type kit to fix the rock chip. Please understand that you will first be sucking. The syringe first creates a vacuum to remove trapped air from the break. The pressure step then forces repair resin into the damaged area. (to clear air bubbles) and forcing it back in with air pressure. Practice locking the plunger in the two positions, vacuum & pressure, before squeezing in the resin.
- Be careful to press the doughnut shaped adhesive firmly against the windshield around the chip.. When we didn’t pay enough attention to this step, the resin worked its way through and trickled down the windshield.
Step-by-step instructions
- Get a windshield repair kit, any of these kits on Amazon should work and follow the instructions supplied with that kit.

- Clean the area and the chip. Use a sharp object like a razor blade or a pin to remove loose glass fragments and debris. Do not use any type of liquid. The area needs to be dry for this repair to work.
- Mount the seal on the windshield. Peel the backing off one side of the adhesive seal. Press the seal onto the glass to ensure the rock chip is in the center. Put some pressure on your finger to make sure it is sticking all around.

- Peel off the paper backing from the top of the seal, exposing the adhesive where the pedestal will sit.
- Install Pedestal. Mount the pedestal to the adhesive seal. Press the pedestal firmly against the glass. Make sure the pedestal is fully bonded to the adhesive seal.
- Place the resin into the pedestal. First, cut the tip off the resin container. Save a small amount of resin for the finishing step. Even if you squeeze out the whole resin, don’t worry. Leave the resin container upside down with the cap on it. This will allow any residual resin to collect at the tip of the resin bottle, which you will use later.
- Connect the syringe to the pedestal, pressing it firmly into the pedestal. If your kit comes with the pin, place it into the syringe.
- Lock the plunger into the VACUUM position. This step will suck the air from the little cracks in the windshield caused by the rock chip. You should not need to hold the plunger by hand once it is locked in position. Leave it in the vacuum position for 10 minutes, or for the time specified by your kit.
- Remove the pin. This will allow the syringe to fill with air. Then, place the pin back on.
- Move the plunger to the pressure position. Push the plunger down to create pressure inside the syringe. Make sure to lock the plunger into this position.
- Leave it under pressure for at least 20 minutes, or follow the timing specified by the kit.
- Remove the pedestal. Using a razor, carefully remove the pedestal from the glass.
- Fill the impact pit. Get the small resin bottle and place a drop of resin in the center of the rock chip. Place the curing film over the center, ensuring some resin is in the center of the rock chip.
- Let the resin cure for about 15 minutes, or follow the curing time specified by the kit. Let it cure in the sun. The ultraviolet sun rays cure the resin.
- Clean. Remove the film and any cured resin sticking to your windshield using a safety razor.
- That’s it. You are done.


FREQUENTLY ASKED QUESTIONS
The primary reason is that you want to prevent the chip from developing into a larger crack because of the rock chip damage. The secondary benefit is that the rock chip will be much less visible. A successful repair should make the damage less noticeable, but a small cosmetic blemish may remain. In case you were wondering, it is illegal to drive with a broken windshield in many states. So don’t let that rock chip turn into a windshield replacement.
The Blue Star kit is designed for a single repair, while the Rain-X kit can be used for multiple repairs, and it is also ranked #1 on Amazon at the time of this writing.
DIY Windshield Chip and Bullseye Repair Videos.