 MB Medic Mercedes-Benz Repair Guides, Service, How To DIY
Last updated:
In this guide (4 sections)
Removing the front bumper cover on a W210 Mercedes-Benz E-Class is easy once you follow the instructions below. Learn what parts and bolts you need to take off to remove the front bumper. These instructions apply to the following models:
- E320
- E430
- E55 AMG
- E200
Years 1996, 1997, 1998, 1999, 2000, 2001, 2002. Even though we took these pictures from a facelift model, the pre-facelift bumper is similar in design.
Tools Needed
- Drive socket set (must have 8mm and 10mm sockets)
- Torx Bit
- Floor Jack (optional)
- Automotive wheel ramps (recommended)
- Screwdrivers
Parts Needed
Because the W210 has been around for years, there are many front bumper upgrades available. Check out these W210 Upgrade Bumper Kits on Amazon.
Instructions
The bumper can be removed without raising the car, but it will be a lot more difficult. It is better to put the front of the car on jacks, or an even better option is to use Nice Solid Steel Auto Ramp Set.
- If you are raising the vehicle, make sure to put jack stands underneath. Have the car in Park and place blocks behind the rear wheels.

- Turn the steering to full right lock before you raise the car, which opens up access behind the wheel. Power steering makes that easy with the engine running, so do it with the car still on the ground, then switch the engine off and take the key out. Every step after this one puts your hands behind the wheel liner and alongside the tire, and there is no reason for the engine to be running while they are there. Remove the 8mm bolts from the front wheel well liner.

- Access the back of the bumper.
 Remove the sheet screw at the end of the bumper. Once you do that, you can pull the front bumper release.
- Move the wheel liner and pull the bumper release slider toward you (toward the back of the vehicle).
- Move your hand behind the fender. There is a 10 mm bolt that needs to be removed. It’s hard to see, but you should be able to feel it. Below is a picture of the 10mm bolt that needs to be removed. You can access this bolt by reaching between the front tire and the bumper. Here is another picture of how this bolt looks. It is long and will take several turns to remove it.

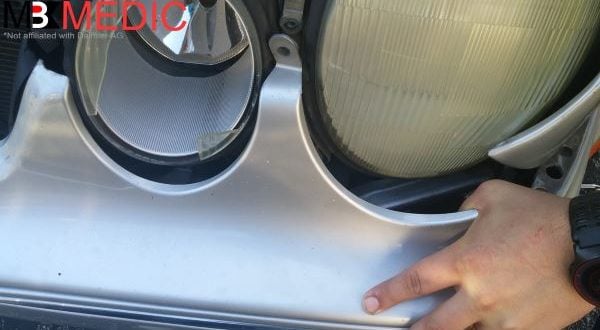
- Remove the 8mm bolt that fastens the front bumper to the headlight. This is between the two lenses of the headlight assembly, as shown below.

- Now the sides of the front bumper should be loose. You may need to move the bumper back and forth to unhook the pin shown in the picture below. The pin that points down is part of the front fender.
- Next, you need to remove the 12mm bolts in front of the radiator.

- Remove the lower plastic grille, using a flat screwdriver to pop it out at the connection points. There is also the air temperature sensor on the driver’s side, which you should remove at this point.
- Remove the side markers. Pry them out using a flat screwdriver. Twist the light bulb socket to remove the bulb. Or you could also unplug the light bulb from the back and not worry about removing the side marker.
 Remove the bolts from the bottom splash guards. Only the bolts connecting to the front bumper need to be removed. You may find it easier to remove the front splash guard completely, which will allow you to see and access the bumper from underneath.
- Disconnect the front fog lights.
- Remove the front bumper from your W210. It may be easier to have someone help you at this point. The front bumper can now be removed by pulling it forward.


 Remove the sheet screw at the end of the bumper. Once you do that, you can pull the front bumper release.

 You can access this bolt by reaching between the front tire and the bumper. Here is another picture of how this bolt looks. It is long and will take several turns to remove it.


 Remove the bolts from the bottom splash guards. Only the bolts connecting to the front bumper need to be removed. You may find it easier to remove the front splash guard completely, which will allow you to see and access the bumper from underneath.

Instructions on how to remove and install the front bumper on W210 E320 E430 E240 1996-2002.
Putting it back on, which is not simply the reverse
The guide above ends with the bumper in your hands, and the hard part is the other direction. Refitting is where the tabs get broken and where a cover ends up sitting slightly proud on one side for the rest of the car’s life.
- Reconnect everything before the cover goes home. The fog lights and the side marker bulbs are easy to reach with the bumper off the car and nearly impossible once it is seated. Plug them in, and check they work, while you still have access.
- The side guides have to engage first. The cover locates on guides behind each fender before any bolt lines up. If you are trying to start a bolt and the hole is not where it should be, the sides have not engaged. Pushing harder at that point is how tabs break.
- Start every bolt loose and tighten at the end. Leave the fender and headlight fixings finger tight until all of them are started, then close the gaps and tighten. Tightening as you go locks in whatever misalignment you happened to have.
- Do it warm if you can. A bumper cover is plastic, and plastic is stiffer and more brittle when cold. A cover that flexes willingly into place in a warm garage will fight you and crack on a freezing driveway.
Before you tighten the last bolts, stand back and look along the gap between the bumper and each fender. They should match side to side. That is the moment to fix it, not after.
Check the lights before you call it done
This job disconnects the fog lights and usually the side markers, so finish by switching everything on and walking round the car. If a lamp is dead afterwards it is a disturbed connector nine times out of ten, not a coincidence, and the connector you cannot see is the one behind the part you just refitted.
If a bulb out message appears on the cluster with the lamp visibly working, that is a separate thing: these cars judge a bulb by the current the circuit draws, so a stored fault from the time the connector was unplugged can persist. The YOUCANIC UCAN-II Pro reads and clears the body modules that hold bulb monitoring, which a basic OBD-II reader does not reach, and that tells you whether the message is live or left over.
Related Resources
- W210 headlight removal, upgrade and aiming, which is the job this bumper usually comes off for
- DIY: How to remove the front bumper (W210)
- E55 AMG W210 Facelift front bumper removal
- How to Remove a Mercedes Front Bumper on a Late W210 “Facelift” Model
Before you buy parts, scan every control module, not just the engine. It shows the root fault behind the warning lights and tells you whether the problem is still active. See how to do a full health check.


Interested in rerpair and replace front bumper on 2000 – 320 Mercedes Benz – articule very interesting