 MB Medic Mercedes-Benz Repair Guides, Service, How To DIY

Last updated:
In this guide (8 sections)
The X164 GL keeps its fuses in four places, and the engine bay box is in an unusual spot that catches people out.
- Engine bay, behind the headlight on the passenger side. Not next to the bonnet hinge as on most Mercedes of this era. This panel holds the front SAM, so it covers engine management, lighting and most front circuits.
- Side of the dashboard, passenger side. Behind the end cap, visible with the door open. Interior circuits.
- Under the passenger seat, next to the battery. This is the one almost nobody finds, because the seat has to come back and nothing about the cabin suggests fuses live under there.
- Rear, boot on the passenger side. Rear SAM circuits plus the relay panel, which is where the trailer hitch, heated rear window, rear wiper and the power sockets are controlled.
So before you start pulling trim, work out which end of the car the dead item is at. Front circuits are behind the headlight, cabin circuits are at the dash, and anything to do with the tailgate, trailer or rear sockets is in the boot.
Press Ctrl and F, or Command and F on a Mac, and type the fuse number or the circuit you are after.
On the rear relay chart further down, the same letter appears against two different circuits. Relay positions on the X164 vary with how the car was built, particularly whether it has a trailer hitch and a rear wiper, so treat the chart as a guide and let the fuse allocation card in your own car settle it.
Where the Fuse Boxes Are on a GL X164
- Engine Bay ( Behind the headlight on the passenger side)
- Side of the dashboard. (Passenger side)
- Under the passenger seat. Fuses are next to the battery.
- In the rear, trunk on the passenger side.
Which Fuses the X164 Uses
The ATO and MAXI fuses are installed on the fuse box panels. If you want to save on these fuses, you can purchase a box with 100+ fuses on Amazon for only a few dollars.
Models and Years Covered
| Model: | GL320 GL350 GL450 GL550 |
| Years: | 2007 2008 2009 2010 2011 2012 |
| Chassis: | X164 |
| Make: | Mercedes-Benz |
Interior Fuse Box

The interior fuse box is located on the side of the dash. You will find the fuse box on the passenger’s side of the dash. A plastic cover can easily be removed. Use a Dash Trim Removal Tool to avoid damaging the dashboard.
Fuse Box on the Side of the Dashboard, Passenger Side
| Fuse | Function, Purpose, Designation | Ampere |
| 10 | Blower motor Speed Control | 10 |
| 11 | Instrument Cluster, Dashboard | 5 |
| 12 | Air Conditioner Controls | 15 |
| 13 | Steering column, Upper control panel |
5 |
| 14 | Ignition EIS Control Unit | 7.5 |
| 15 | Media | 5 |
| 16-18 | Not used | – |
Fuse and Relay Panel in the Rear Compartment

Your Mercedes-Benz also has a fuse box in the rear compartment. To access these fuses, you must remove the cover on the right side of the luggage compartment.
Fuses in the Rear Compartment
| Fuse | Purpose, Designation, Use, Function | Amp |
| 20 | Radio Antenna Filter | 5 |
| 21 | Control Unit N72/2 Rear center console switch module | 5 |
| 22 | Parktronics, Stationary Heater | 10 |
| 23 | COMAND, DVD, Radio, Stereo | 10 |
| 24 | Emergency Tensioner Right Front | 40 |
| 25 | COMAND, DVD, CD Changer | 15 |
| 26 | Door control Unit – Right Front | 25 |
| 27 | Passenger seat adjustment | 30 |
| 28 | Driver seat adjustment | 30 |
| 29 | Emergency Tensioner Left Front | 40 |
| 30 | Fuel Pump | 40 |
| 31 | Steering Wheel Heater | 10 |
| 32 | AIRMatic, Air Suspension | 15 |
| 33 | Keyless Go Remote Entry | 25 |
| 34 | Door control unit, Left front | 25 |
| 35 | Sound System, Amplifier, Subwoofer | 30 |
| 36 | Tele Aid | 10 |
| 37 | Backup Camera | 5 |
| 38 | Digital TV Tuner | 10 |
| 39 | Radio Tuner, Digital Broadcast, Tire Pressure Monitor |
7.5 |
| 40 | Easy Pack Liftgate, Rear hatch door closing | 30 |
| 41 | Overhead control panel | 25 |
| 42 | Panoramic glass sunroof | 25 |
| 43 | Fuel pump | 20 |
| 44 | Socket 12-bolt front | 20 |
| 45 | Socket 12-volt rear | 20 |
| 46 | Cigarette lighter | 15 |
| 47 | Door sill molding lights/illumination | 10 |
| 48 | AdBlue Relay | 5 |
| 49 | Heated rear window | 30 |
| 50 | Liftgate wiper | 15 |
| 51 | activated charcoal filter valve | 5 |
| 52 | Emergency tensioner retractor left and right front | 5 |
| 53 | fuel pump | 5 |
| 54 | Front SAM, Headlight range adjustment |
5 |
| 55 | Instrument cluster, Light switch |
7.5 |
| 56 | AdBlue | 5 |
| 57 | Fuel Pump | 20 |
| 58 | Central Gate Way | 7.5 |
| 59 | Neck Pro Head Restraint | 7.5 |
| 60 | Glove light, Rear Sam Control Unit N10/8 Tele Aid, Comand APS |
5 |
| 61 | Restrain Air Bag SRS, Child seat recognition | 7.5 |
| 62 | Front Passenger and Driver seat adjust switch | 30 |
| 63 | Lumbar Support | 30 |
| 64-65 | Not used | – |
| 66 | Pneumatic motor for multi-contour seats | 30 |
| 67 | Air Conditioner Blower -Rear | 25 |
| 68 | Heated seat and steering wheel | 25 |
| 69 | – | – |
| 70 | Trailer hitch | 20 |
| 71 | Electric brake control for trailer | 30 |
| 72 | Trailer hitch socket | 15 |
Engine Compartment Fuse Box, Front SAM

There are fuses located in the engine bay. They are located right behind the headlight, on the passenger side.
Fuse Box in the Engine Bay
| Fuse | Function | Ampere |
| 100 | Wiper | 30 |
| 101 | Purge Control, Oxygen Sensor Upstream |
15 |
| 102 | Transmission Oil Pump | 10 |
| 103 | Engine Control Unit | 25 |
| 104 | – | 15 |
| 105 | Connector, ME Control Unit | 15 |
| 106 | Not used | – |
| 107 | Air Pump | 40 |
| 108 | Air Compress for Air Suspension | 40 |
| 109 | Electronic Stability Control ESP | 25 |
| 110 | Antitheft Alarm System, Siren | 10 |
| 111 | Direct Select | 30 |
| 112 | Headlights | 7.5 |
| 113 | Horn | 15 |
| 114 | Front SAM N10 | 5 |
| 115 | ESP | 5 |
| 116 | VGS | 7.5 |
| 117 | Distronic DTR | 7.5 |
| 118 | Engine | 5 |
| 119 | Control Unit | 5 |
| 120 | Engine | 10 |
| 121 | Heater | 20 |
| 122 | Engine Starter | 25 |
| 123 | Fuel Filter | 20 |
| 124 | Power Steering | 7.5 |
| 125 | Not used | – |
Relays in the Rear Compartment
| K | Relay, circuit 15R sockets |
| L | trailer hitch |
| M | heated rear window |
| O | Circuit 15 relay |
| O | Fuel Pump |
| P | Rear Wiper |
| R | Circuit 15R |
| S | Front socket |
| T | Rear socket |
| U | Trailer Hitch |
| V | Spare |
Which Fuse Do I Need to Replace a Blown One

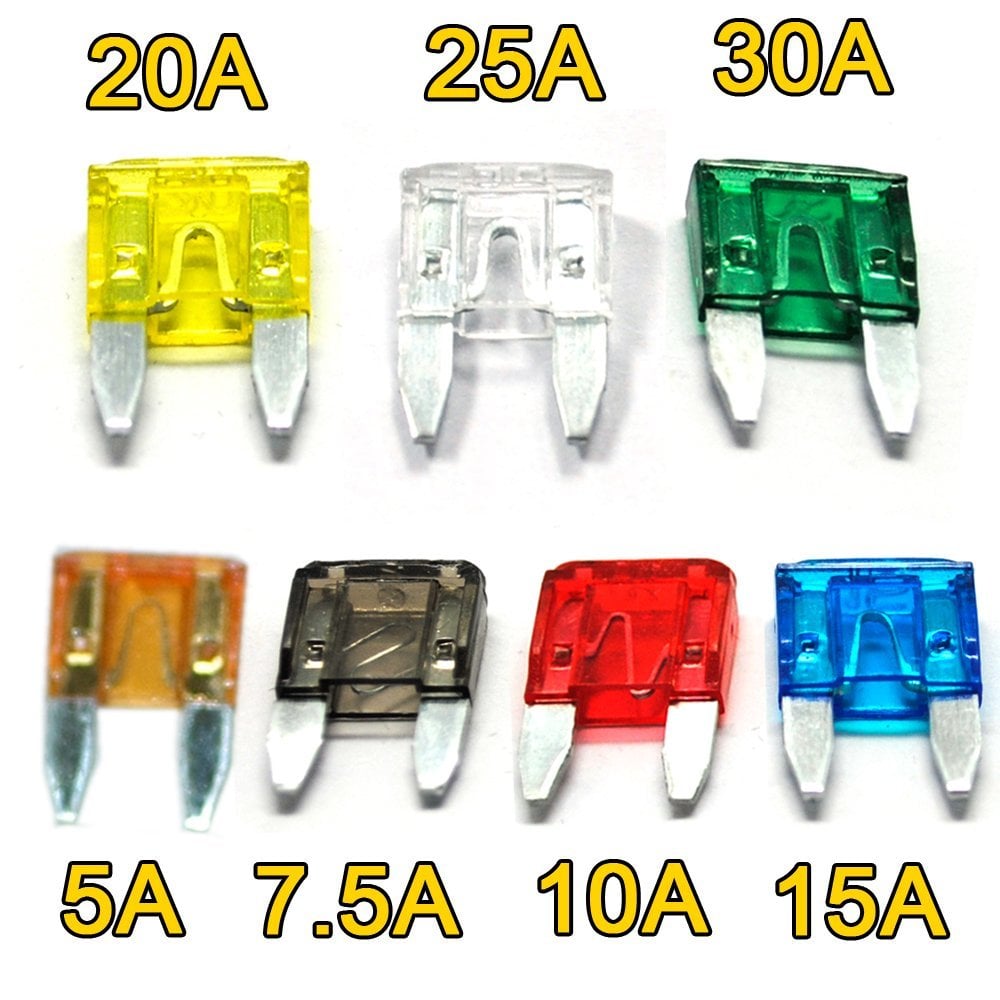
Your Mercedes-Benz uses Automotive Blade Fuse Type. A box of 100 fuses that include all the different ampere ratings you need costs less than $20 on Amazon.
[/vc_column_text][vc_message] When replacing blown fuses, use the same ampere rating fuse. The fuse rating is written on the fuse. You can verify that you are using the correct fuse by ensuring the fuse colors match the blown fuse and the new fuse. This indicates the same ampere rating.
- Make sure to close the fuse box cover properly and lock the tabs. This is very important to avoid any moisture getting inside the fuse box. The fuse box panel has a seal to keep water and moisture out of the box.
Fuses do not wear out. They blow because current exceeded the rating, so a blown fuse is a symptom rather than the fault.
- Blew once and the new one holds. An event. Note it and move on.
- The new one blows the instant you fit it. A dead short to ground, often where a harness crosses a bulkhead or runs near something that moves.
- Blows after a few minutes or only under load. A motor or component drawing too much as it heats up.
The fuse protects the wire, not the component, so a larger fuse only lets more current into a circuit that is already faulty. On a GL with a trailer hitch, a blown socket or hitch fuse is very often the trailer wiring rather than the car, so unplug the trailer and retest before you go looking in the boot.
Keep a fuse assortment and a test light in the car.
When the Fuse Is Fine and the Circuit Is Still Dead
On an X164 the fuse panels sit alongside the front and rear SAM modules, and most body circuits are switched by an output inside those modules rather than by a relay you can swap. So the fuse can test good, the component can be good, and nothing happens because the SAM output has failed.
No scan tool can see a blown fuse. Nothing on the diagnostic socket can. What a scan tool does is read the SAM and report whether that channel shows an open circuit, an overload or a dead output, which is the difference between replacing a part and replacing a module.
The YOUCANIC UCAN-II Pro reads the front and rear SAM along with every other module on the X164, so you can tell a dead output from a dead component. It covers nearly everything XENTRY does apart from online VIN coding.
A SAM with a burnt output is a board level repair rather than automatically a new module. Module Medics repairs front and rear SAM units, which keeps your original part number and avoids the coding a replacement needs.
Related Reading
M-Class W164 Fuse Chart
The GL shares its platform with the W164 ML, so the layouts are closely related.
Understanding the SAM Module
What a failed SAM output looks like when every fuse tests good.
W166 M-Class and GLE Fuse Chart
The generation that followed, with two prefuse boxes.
Where Is the OBD2 Port
Port location by model, for scanning the SAM.
Before you buy parts, scan every control module, not just the engine. It shows the root fault behind the warning lights and tells you whether the problem is still active. See how to do a full health check.

